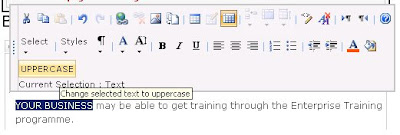
It is recommended that you use the Telerik RadEditor Lite for MOSS which is free if you have a valid MOSS 2007 license, but if you end up using the MOSS HTML editor you can enrich it by adding custom buttons.
Below I will create a button that will uppercase all selected text:
We start by creating a JavaScript file RTEToUppercase.js in [..]\12\TEMPLATE\LAYOUTS\1033 folder.
If you are using WSP Builder in your project then you will just create the folder path above starting from the Template folder and add the JavaScript file their.
We need to add the first function into the RTEToUppercase.js as follows:
//RTE2_RegisterToolbarButton("ID of button", "IconUrl", "Toolbar Text", "Tooltip", "ClickCallback function name", "ResetStateCallback function name")
RTE2_RegisterToolbarButton("ToUpperCase",
"",
"UPPERCASE",
"Change selected text to uppercase",
ToUpperCaseButtonOnClick,
ToUpperCaseButtonOnResetState,
new Array());
//Then we need to create the ClickCallback function which does all the work when the button is clicked
function ToUpperCaseButtonOnClick(strBaseElementID, args){
var docEditor = RTE_GetEditorDocument(strBaseElementID);
if (docEditor == null) { return; }
//gets the selected html/text
var selectedRange = docEditor.selection.createRange();
//uppercase the selected text
var strUpperCased = selectedRange.htmlText.toUpperCase();
//paste it back to editor
selectedRange.pasteHTML(strUpperCased);
//restore selection
RTE_RestoreSelection(strBaseElementID);
return true;
}
//Finally we create the ResetStateCallback function to enable or disable the button depending on whether or not text has been selected
function ToUpperCaseButtonOnResetState(strBaseElementID, args){
var docEditor = RTE_GetEditorDocument(strBaseElementID);
if (docEditor == null) { return; }
//restore selection
RTE_RestoreSelection(strBaseElementID);
//check if we have selected text
if (docEditor.selection.createRange().text.length != 0){
RTE_TB_SetEnabledFromCondition(strBaseElementID, true, "ToUpperCase");
} else {
RTE_TB_SetEnabledFromCondition(strBaseElementID, true, "ToUpperCase"); }
return true;
}
Save the file
Then we need to edit the following file Site Actions -> Site Settings -> Modify All Site Settings -> Master pages and page layouts -> Editing Menu -> RTE2ToolbarExtension.xml
Add the foillowing to the XML file
<?xml version="1.0" encoding="utf-8" ?>
<RTE2ToolbarExtensions>
<RTE2ToolbarExtraButton id="ToUpperCase" src="RTEToUppercase.js"/>
</RTE2ToolbarExtensions>
Publish and away you go.
But instead of editing manually the best way is to add a Feature that will deploy the RTE2ToolbarExtension.xml file.
Unfortunately you cannot use provisioning technique to deploy this file but you can use Feature recievers as shown in the following blog
http://msdn.microsoft.com/en-us/library/cc843966.aspx under "Deploying Page Editing Toolbar Customizations" section.
Once you have installed and Activated your feature you should have your UPPERCASE button appear when you edit using the Rich HTML Editor as shown below.


_504.png)