Saturday, September 12, 2009
Friday, July 31, 2009
Nice feature for deploying AJAX 3.5 web.config settings
I original downloaded this feature as I wanted to deploy the AJAX 3.5 web.config settings to the farm.
http://platinumdogs.wordpress.com/2009/07/20/sharepoint-feature-for-net-3-5-web-config-changes/
After downloading the VS solution and having a look around I decided to add all my web.config values to the webconfig.xml in this neat feature.
Deploying config values couldnt be easier!
http://platinumdogs.wordpress.com/2009/07/20/sharepoint-feature-for-net-3-5-web-config-changes/
After downloading the VS solution and having a look around I decided to add all my web.config values to the webconfig.xml in this neat feature.
Deploying config values couldnt be easier!
Thursday, June 25, 2009
Check if SPList or SPView exists
One thing that the SharePoint team left out is a built-in way to see if a SPList or SPView exists.
So if you have the Dynamic library from ScottGu's Blog then you can setup an extension method or helper method with the following linq:
SPList
spweb.Lists.Cast().Any(list => string.Equals(list.Title, listName));
SPView
splist.Views.Cast().Any(view => string.Equals(view.Title, viewName));
both return a boolean
So if you have the Dynamic library from ScottGu's Blog then you can setup an extension method or helper method with the following linq:
SPList
spweb.Lists.Cast
SPView
splist.Views.Cast
both return a boolean
Monday, June 15, 2009
MOSS Search crawler not populating out of the box or custom metadata properties
One interesting issue we faced on my current ongoing project was that MOSS Search crawler would not popluate the out of the box or custom metadata properties, it would return results as if it was a HTTP crawl. This was only an issue on 1 farm, unfortunately this was the production farm, the UAT environment was working as expected.
After a colleague of mine searched the interent endlessly, finding others with the same issue but no answers, we logged a call with Microsoft and got a guy on live meeting who solved the issue in about 5 minutes.
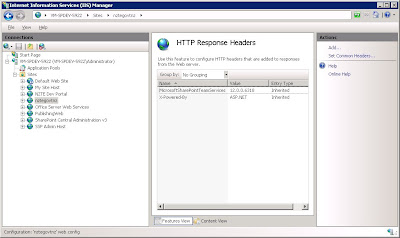
When SharePoint creates the IIS Web Application it should place a HTTP Response Header called MicrosoftSharePointTeamServices with a version number as shown below:

In our case in production for whatever reason it did not create this header.
Adding the header manually got use up and running!
PortalSiteMapProvider randomly drops off pages
I built custom navigation for the http://nzte.govt.nz website using the PortalSiteMapProvider.
This is a powerful ally in the SharePoint Publishing Site world as it handles caching and security trimming. It also means that when you use one of the built-in instances of the PortalSiteMapProvider like CurrentNavSiteMapProvider you can use the navigation edit menu under Site Actions->Site Settings to hide/show sites and pages, change the order and add new links.
One thing that was unexepected was that every now and then the PortalSiteMapProvider would not return pages. We had content editors showing us screenshots of the menu showing only sites. This was easy to replicate by pressing F5 repeatedly until eventually it would happen (around 20-40 refreshes).
Now by default the propoerty IncludePages is set to PerWeb, so in attempt to fix the issue I added IncludePages="Always" to the web config as follows:
<add name="CurrentNavSiteMapProvider" .... includepages="Always" dynamicchildlimit="0">
but this didnt help.
The answer is to set the IncludePages property in your code block when you are building your navigation as follows:
One other thing is to set the DynamicChildLimit in the web config as by default it only displays 50 and if you have over 50 items it can also cause unexcept results like not displaying anything at all. As you can see above I have set it to 0 which means it has no limits.
This is a powerful ally in the SharePoint Publishing Site world as it handles caching and security trimming. It also means that when you use one of the built-in instances of the PortalSiteMapProvider like CurrentNavSiteMapProvider you can use the navigation edit menu under Site Actions->Site Settings to hide/show sites and pages, change the order and add new links.
One thing that was unexepected was that every now and then the PortalSiteMapProvider would not return pages. We had content editors showing us screenshots of the menu showing only sites. This was easy to replicate by pressing F5 repeatedly until eventually it would happen (around 20-40 refreshes).
Now by default the propoerty IncludePages is set to PerWeb, so in attempt to fix the issue I added IncludePages="Always" to the web config as follows:
<add name="CurrentNavSiteMapProvider" .... includepages="Always" dynamicchildlimit="0">
but this didnt help.
The answer is to set the IncludePages property in your code block when you are building your navigation as follows:
PortalSiteMapProvider psmp = PortalSiteMapProvider.CurrentNavSiteMapProvider;
psmp.IncludePages = PortalSiteMapProvider.IncludeOption.Always; //resetting as it sometimes drops off
SiteMapNode siteMapNode = psmp.FindSiteMapNode(elevatedWeb.ServerRelativeUrl);
Listleve1ItemList = new List ();
for (int i = siteMapNode.ChildNodes.Count - 1; i >= 0; i--)
{
leve1ItemList.Add(siteMapNode.ChildNodes[i]);
}
leve1ItemList.Reverse();
level1Repeater.DataSource = leve1ItemList;
level1Repeater.DataBind();
}
One other thing is to set the DynamicChildLimit in the web config as by default it only displays 50 and if you have over 50 items it can also cause unexcept results like not displaying anything at all. As you can see above I have set it to 0 which means it has no limits.
Friday, May 15, 2009
Using LINQ in Sharepoint along side CAML
Using LINQ is a huge advantage when programming. It gives you great flexiblity with minimal code.
CAML is a fastest way to get your data from SharePoint, problem is that building a dynamic CAML query can be rather tedious, hard to read and error prone.
So the solution:
First you should get the Dynamic library from ScottGu's Blog.
Now to get your list items you can run your CAML to do as much as possible, ie return the list items sorted by modified date, filtered by Content Type and maybe bring back a specific number of items (though in this example I cannot specify the RowLimit on my SPQuery as I need the full list to further filter from).
Then if you have further parameters that you need to filter on, ie multiple drop down lists that a user may or may not select, then you can employee LINQ as below:
Of course you would require a few more else if blocks depending on the number of options to filter on but as you can see alot easier to achieve it this way then using just CAML.
CAML is a fastest way to get your data from SharePoint, problem is that building a dynamic CAML query can be rather tedious, hard to read and error prone.
So the solution:
First you should get the Dynamic library from ScottGu's Blog.
Now to get your list items you can run your CAML to do as much as possible, ie return the list items sorted by modified date, filtered by Content Type and maybe bring back a specific number of items (though in this example I cannot specify the RowLimit on my SPQuery as I need the full list to further filter from).
Then if you have further parameters that you need to filter on, ie multiple drop down lists that a user may or may not select, then you can employee LINQ as below:
//Get your list collection ordered and filtered as much as you can using CAML
SPListItemCollection listCollection = web.Lists[listName].GetItems(query);

//check that user is filtering by both industry and country
if (IndustryItem != null && countryItem != null)
{

listItems = listCollection.Cast<SPListItem>()
                                    .Where(p => (p.GetFormattedValue("Country").Contains(countryItem.Title) && p.GetFormattedValue("Industry").Contains(industryItem.Title)))
.Take(5);
}
Of course you would require a few more else if blocks depending on the number of options to filter on but as you can see alot easier to achieve it this way then using just CAML.
Thursday, May 14, 2009
Custom Buttons for MOSS HTML Editor
It is recommended that you use the Telerik RadEditor Lite for MOSS which is free if you have a valid MOSS 2007 license, but if you end up using the MOSS HTML editor you can enrich it by adding custom buttons.
Below I will create a button that will uppercase all selected text:
We start by creating a JavaScript file RTEToUppercase.js in [..]\12\TEMPLATE\LAYOUTS\1033 folder.
If you are using WSP Builder in your project then you will just create the folder path above starting from the Template folder and add the JavaScript file their.
We need to add the first function into the RTEToUppercase.js as follows:
//RTE2_RegisterToolbarButton("ID of button", "IconUrl", "Toolbar Text", "Tooltip", "ClickCallback function name", "ResetStateCallback function name")
RTE2_RegisterToolbarButton("ToUpperCase",
"",
"UPPERCASE",
"Change selected text to uppercase",
ToUpperCaseButtonOnClick,
ToUpperCaseButtonOnResetState,
new Array());
//Then we need to create the ClickCallback function which does all the work when the button is clicked
function ToUpperCaseButtonOnClick(strBaseElementID, args){
var docEditor = RTE_GetEditorDocument(strBaseElementID);
if (docEditor == null) { return; }
//gets the selected html/text
var selectedRange = docEditor.selection.createRange();
//uppercase the selected text
var strUpperCased = selectedRange.htmlText.toUpperCase();
//paste it back to editor
selectedRange.pasteHTML(strUpperCased);
//restore selection
RTE_RestoreSelection(strBaseElementID);
return true;
}
//Finally we create the ResetStateCallback function to enable or disable the button depending on whether or not text has been selected
function ToUpperCaseButtonOnResetState(strBaseElementID, args){
var docEditor = RTE_GetEditorDocument(strBaseElementID);
if (docEditor == null) { return; }
//restore selection
RTE_RestoreSelection(strBaseElementID);
//check if we have selected text
if (docEditor.selection.createRange().text.length != 0){
RTE_TB_SetEnabledFromCondition(strBaseElementID, true, "ToUpperCase");
} else {
RTE_TB_SetEnabledFromCondition(strBaseElementID, true, "ToUpperCase"); }
return true;
}
Save the file
Then we need to edit the following file Site Actions -> Site Settings -> Modify All Site Settings -> Master pages and page layouts -> Editing Menu -> RTE2ToolbarExtension.xml
Add the foillowing to the XML file
<?xml version="1.0" encoding="utf-8" ?>
<RTE2ToolbarExtensions>
<RTE2ToolbarExtraButton id="ToUpperCase" src="RTEToUppercase.js"/>
</RTE2ToolbarExtensions>
Publish and away you go.
But instead of editing manually the best way is to add a Feature that will deploy the RTE2ToolbarExtension.xml file.
Unfortunately you cannot use provisioning technique to deploy this file but you can use Feature recievers as shown in the following blog http://msdn.microsoft.com/en-us/library/cc843966.aspx under "Deploying Page Editing Toolbar Customizations" section.
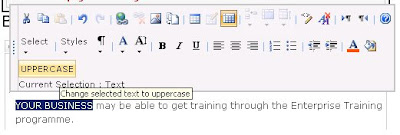
Once you have installed and Activated your feature you should have your UPPERCASE button appear when you edit using the Rich HTML Editor as shown below.

Subscribe to:
Comments (Atom)
_504.png)